Showing posts with label baking. Show all posts

Monday, May 4, 2009

Biscuits!

So, I came home tonight and decided to do some actual cooking. As in, not the quickie stuff I've been doing lately. I had the opportunity to try the baking mix from this post. At first, I tried the baking mix using whole wheat flour...but it just didn't work out. So, I took the leftover baking mix, and mixed it with a new batch of baking mix that I made with white flour. So, without further ado...

BISCUITS

Spoon 2 cups of the baking mix into a bowl.


Make a well; add 1/2 c. cold milk, all at once. Working quickly, stir vigorously with a fork just until dough follows fork around the bowl - this should take 30-40 seconds. Turn dough onto a lightly floured board and knead gently for another half minute (about 10 folds) to remove stickiness.


Roll or pat dough out to 1/4 to 1/2 inch thick. Dip a 2-inch cutter or an inverted glass tumbler in flour; cut dough straight down - no twisting - to form biscuits.

(I decided to be a dork and use a cookie cutter to cut the biscuits...Jason picked a pumpkin shaped cookie cutter.)


For soft biscuits, place dough rounds close together in a shallow, ungreased baking pan; for crusty biscuits, place the rounds 3/4 inch apart on a cookie sheet. Prick biscuit tops with a fork. If you wish, brush tops with milk or melted butter. Bake in an oven preheated to 450F for 10-15 minutes. Makes about 12 biscuits.


Yep, the half white, half wheat flour combo is very yummy.

Friday, April 24, 2009

Homemade Baking Mixes

I borrowed this book from my co-worker awhile back...I forget what it was called, but she's had this book for 25 years, and it is absolutely the most awesome book I've ever seen (ok, there are others just as awesome, but maybe this is the most awesome cook-type-book). It's a huge book full of recipes for making your own groceries at home. I'll probably post various things from it from time to time, but for today, I decided to post the baking mixes section (wish I had the stupid power cord for my scanner, I'd just scan the pages and post the picture...oh well).

BISCUIT AND BAKING MIX (like Bisquick)
8 3/4 cups flour (I used wheat flour, but wouldn't recommend it...maybe half white and half wheat, but don't use all wheat, k? Just not good...)
1/3 cup baking powder
1/4 cup sugar
1 tbsp. salt
2 cups vegetable shortening

In a very large mixing bowl, sift together the flour, baking powder, sugar, and salt. Use a pastry blender, or two knives, or your fingertips to cut in the shortening, 1 cup at a time, until the mix looks like coarse meal. Put in a covered container or plastic bag. Store at room temperature for about 3 months. For longer storage, place in freezer. To measure mix for use, lightly spoon it into a measuring cup; do not pack; level with a spatula.

BISCUITS
Spoon 2 cups of the above mix into a bowl. Make a well; add 1/2 c. cold milk, all at once. Working quickly, stir vigorously with a fork just until dough follows fork around the bowl - this should take 30-40 seconds. Turn dough onto a lightly floured board and knead gently for another half minute (about 10 folds) to remove stickiness. Roll or pat dough out to 1/4 to 1/2 inch thick. Dip a 2-inch cutter or an inverted glass tumbler in flour; cut dough straight down - no twisting - to form biscuits.

For soft biscuits, place dough rounds close together in a shallow, ungreased baking pan; for crusty biscuits, place the rounds 3/4 inch apart on a cookie sheet. Prick biscuit tops with a fork. If you wish, brush tops with milk or melted butter. Bake in an oven preheated to 450F for 10-15 minutes. Makes about 12 biscuits.


DROP BISCUITS

Increase milk to 2/3 cup. Do not knead. Drop dough from a teaspoon onto a well-greased cookie sheet. Bake as directed.


CHEESE BISCUITS

Add 1/3 cup grated cheese, any flavor, to dough.

ONION BISCUITS
Add 1/4 cup chopped, sauteed onions to dough.


HAM-BACON BISCUITS

Add 1/3 cup crisp bacon bits or 1/4 cup very finely chopped cooked ham to dough.

PANCAKES
In a mixing bowl, combine 1 1/3 cups milk and 1 egg. Add 2 cups of lightly spooned baking mix; beat smooth with an egg beater. If you wish, fold in 1/2 cup blueberries or 3/4 cup sliced apples. Drop mixture in 1/4 cup measurements onto a hot, lightly greased griddle. Makes 10 4-inch pancakes.

SHORTCAKES
Use a fork to lightly beat 1 egg in a mixing bowl; add 1/2 cup milk, 3 tablespoons sugar, and 3 cups of lightly spooned baking mix. Stir quickly with a fork to moisten, about 30 strokes. Turn onto a floured surface and knead well, 8 times. Roll out dough 1/2 inch thick. Using a floured cutter or inverted glass tumbler, cut dough into an equal amount of 2 1/2- and 3-inch rounds. Brush a larger round with melted butter and place a smaller one on top of it. Repeat until you have 5 or 6 double shortcakes. Place on an ungreased cookie sheet, gently prick tops with a fork; butter them if you wish. Bake in a preheated 425F oven for 12-15 minutes.

QUICK MEAT OR CHICKEN PIE
Pour 4 servings of canned or homemade beef or chicken stew into a buttered casserole dish; bake at 425F for about 10 minutes. Spoon 1 cup of baking mix into a bowl, make a well, and, all at once, pour in 1/3 cup of milk. Stir vigorously with a fork until moistened. Drop by teaspoonfuls on top of the heated stew. Bake 20-25 minutes more, then serve.

Friday, April 17, 2009

Pumpkin Bread Rerun

I wrote a few posts awhile back that were rather cluttered, with multiple topics. I've decided to spread them out into separate posts to make them more easily searchable. So, here's the pumpkin bread recipe from this post.

Ok, now to something a bit yummier. I made pumpkin bread today! Now, I mentioned a long time ago that I like to make jars of stuff to give people every year. The pumpkin bread was from one of those jars. I love the leftovers as much as I love the gifts! They always come in handy, and give me lots of new recipes to use. Sometimes, I'll make up extra jars during the year so that I'll have quick, easy recipes on hand. Here's a picture of the first jars I ever put together:
This one was green and yellow split pea soup. Super easy, super cheap, and makes a HUGE pot of soup. Anyway, I've had these jars of pumpkin bread in the cupboard for awhile, and the only time I ever make it is around Harvest time, if I'm assigned cakes and ale for a ritual...which...well...hasn't happened in a long while, beings that I'm very super duper extra solitary right now. Which means, I haven't made pumpkin bread in ages. I've had the jar sitting on the counter for a week, so I FINALLY went for it today! Here's the recipe:

Quick Pumpkin Bread

2 c. all-purpose flour
1 c. packed light brown sugar
1/2 c. raisins
1/2 c. chopped pecans or walnuts
1 1/2 tsp. pumpkin pie spice
1 tsp. baking soda
1/2 tsp. baking powder
1/2 tsp. salt

1. Layer ingredients attractively in any order in 1-quart food storage jar with tight-fitting lid. Pack ingredients down slightly before adding another layer.
2. If gifting (or if desired), cover top of jar with fabric, attach recipe tag with raffia or ribbon.

Recipe Tag:
1/3 cup butter, softened
2 eggs
1 c. canned pumpkin (I save and freeze my leftover Samhain pumpkin ever year, just for this recipe)
1 jar Quick Pumpkin Bread Mix

1. Preheat oven to 350 F. Spray 8 1/2 x 4 1/2 inch loaf pan with nonstick cooking spray (I didn't have any...used olive oil, worked fine).
2. Beat butter in large bowl with electric mixer until creamy. Add eggs, one at a time, beating well after each addition. Beat in pumpkin until well blended. Add contents of jar; stir just until blended. Pour into prepared pan.
3. Bake 50-55 minutes or until toothpick inserted into center comes out clean (mine took 65 minutes, but I had too much liquid in my bread...it came out fine, though). Cool in pan on wire rack 15 minutes. Remove from pan and cool completely on wire rack. Makes 1 loaf.

And here is the finished product:

Thursday, April 16, 2009

Easy Bakeware

Have you been getting the Easy Bakewear pans for free? I don't know how to do banner links, but this blog has a banner right up at the top that will take you to the web site. So far, I've ordered two pans. I've recieved one of them, and it's quite nifty. But that's not why I'm blogging about this.

BUYER BEWARE!!!

You'll get your free bakeware all right...but you'll also get a bill for $14.95 for something else. If you're the type, like me, who trusts that everything is as good as it looks, you might want to put that whole trust thing on hold for a few minutes. When you sign up for the $1 shipping, a bunch of stuff pops up that tells you that if you sign up for the $1 shipping (effectively making your bakewear $1, which is a screamin' deal), you are agreeing to sign up for some worthless thing that does nothing for you, for which you will be charged monthly, blah blah. You have 7 days to cancel your membership. So, if you do order one of their pans, I'd recommend putting in your order and going right straight to the phone to cancel the worthless whatever you call it thing that charges you for nothing.

What? I'm not angry. Why would you think that? I'm totally fine about the fact that I only have a few bucks til payday, the radiator hose is busted, I had to buy gas this morning, and now I get to worry about the bank balance dropping below zero, resulting in $30 in overdraft fees because businesses don't give a crap about the little guy, and will gouge you any way they can JUST because they can get away with it. I'm not angry at all. See this GREAT BIG SMILE on my face??? I'm fine, I tell you! Now shut up and leave me alone!

Monday, March 23, 2009

Menu Planning

I've mentioned Flylady a few times, I think. I'm sure I'll write a post eventually dedicated only to Flylady stuff, but this one is specifically about one part of my life that has changed as a direct result of becoming a Flybaby. I used to just write a general grocery list of the basics, not worrying about what I was going to make. I figured I had most of the ingredients to make a few good meals, and it usually worked out pretty well. Unfortunately, we'd end up running to the store quite often because we were still missing one or two ingredients. So, starting to plan my meals ahead of time has been awesome.

I actually started doing this after I saw Leanne Ely's Saving Dinner sample menu's, and realizing that would help me tremendously. I have a couple of menu's written up and saved in my documents, but it proved to be too much work to keep making those great big ol' lists over and over again, and I never wanted the same one twice (especially since I'm always experimenting with something, and if I try to add an experimental meal to the list and it turns out disgusting, I have to find something to replace it with...and it's just more trouble than it's worth).

So, I came up with a system half way in between the big, elaborate meal plan and the fly by the seat of my pants (and make a few extra runs to the grocery store in between shopping trips) systems. I'm going to walk you through my little system, just in case it helps. Actually, I'm going to walk you through what I did last time, since it changes a little every time, and I liked the most recent grocery shopping trip so much.

The first thing I did was peek around in the cupboards to see what we already have that could make meals we both like. For example, we have tons of leftover tuna and cream of mushroom soup, along with a few bags of pasta. Viola, quick and easy tuna casserole. We have plenty of kidney beans and some cornmeal. So, chili and cornbread would be a great meal to have. I went through like this, adding the name of each meal until I had 30 meals (but as I mentioned in my earlier post, I usually only do 14 meals).

For each meal, I then write down how much of each ingredient we need. It looks like this:
Most of the meals are pretty self explanatory (for instance, we bought those taco meal kits that have everything in them except meat and produce, so I didn't break those out into ingredients). I usually only write down the ones where I'm changing the menu to conserve (like, corn chowder usually uses 2 cans of cream of potato soup and 2 cans of evaporated milk, but I figured we could cut it in half and have sandwiches with it this time). I wouldn't do this if I were the only one cooking, but if Jason decides to cook (like he did tonight...well, I kinda decided for him, but he could have said no), he needs to know what ingredients I planned for him to use. Sometimes he'll grab twice as much of an ingredient than he needs, and we don't have enough for another meal.

Anyway, I don't necessarily write down every ingredient for every meal, but I at least mentally make this list for each meal. While I'm doing this, I make my grocery list (I'd been working on it the whole time, actually, but this is the step where I double and triple check that I have everything on the list). Then I check my master grocery list (another flylady suggestion), and I'm done.

Before dinner that night, I make sure the list of ingredients, and a complete list of all the meals I have planned for that [month, bi-week, or week] are on the fridge. I'm pretty new still to the coupon thing, but so far, this is the part where I grab coupons, and I'll add any good coupons to my grocery list, and grab any coupons I think might come in handy while I'm out. Then I'm off to the store!

Wednesday, March 18, 2009

Onion and Pumpkin and Syrup, Oh My!

I had a fun day today, so I thought I'd share.

I have had this plantar wart on the bottom of my left foot for years. I've bought the over the counter crap. Doesn't work. It shrinks the wart, makes it ugly, makes it easy to slough off the top few layers...but it also creates a thick layer of skin that gets used to the chemicals, and forms a thick, protective barrier over the root of the wart. Great!

I went to the doctor in November to have it frozen off. The first appointment hurt like heck because they had to rip the skin off the top (that thick, protective layer of skin), and freeze the root of the wart with nitrogen. AND IT DIDN'T EVEN WORK! Stupid doctors. (No offense to any doctors that read this post...I've learned that there are things to go to the doctor for, and things to call my friends for...this is one thing I'm not ever going to waste money on doctors for again.) They told me I'd have to just keep coming in every couple weeks (at $25 a pop) until it was gone. I went back in one more time, but my insurance got messed up after the new year and I couldn't go back.

Not only did that damn wart grow to ridiculous proportions in the 2 month span since the last time I went in, it also SPAWNED! I ended up with about 20 little baby warts hanging around the Big Mama.

I have a friend who is an herbalist (*waves to Tamara!*). Quite some time ago, she told me about this gentle, Earth-friendly remedy for warts. I never tried it. I have to be honest...I'm lazy. I put that harsh chemical crap on my foot once a day for years...it was easy. I was getting into bed, and I'd just smear it on, and hop into bed. It provided a handy excuse for not getting out of bed when I forgot something...resulting in many, many trips to the bathroom, living room, and kitchen for Jason after he was all snuggled in for the night. *blush**bat eyelashes*

Now, it's not that this Earth-friendly remedy was really all that difficult or time consuming. I just couldn't figure out how to work it in. Let me explain. (It's so super simple, I can't even believe I put it off this long).

You take 2-3 onions and 2-3 lemons. Cut the onion in half, and remove just enough of the center of the onion to make a bowl (make sure the bottom is intact so it doesn't leak). Then, take a lemon, cut it in half, and squeeze the juice into the center of the onion. Put the onion on some tin foil in a muffin pan (just to keep it upright). Gather the tin foil over the top to seal in the juice. Cook on 350 for a couple hours until the onion is translucent. This is what comes out of the oven:
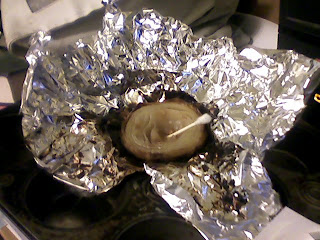
You just take a qtip and rub the juice on your wart whenever you think about it. Repeat every day until your onions and lemons are used up. Oh, and drink some anti-viral tea a couple times a day while you're doing this treatment (which reminds me, I'm going to go make myself a cup of licorice tea right now before I finish). Tamara says that for about 2 weeks after the treatment, you'll wonder if it worked...and then the wart will just slowly disappear. I'll let you know how it works out (I'm on day 4...I think...).

The thing I worried about (silly in retrospect) was how to do my job, and how to deal with other daily obligations if I'm supposed to be hanging around smearing stuff on my foot all day. I'd have to not wear socks or shoes, and I'd have to transport this smelly onion to work and back every day. I never have a four day weekend (and this wart has gotten so out of hand that I need a six day treatment, so I most certainly never get THAT many days off in a row). But it's easy actually. First of all, my hours were cut back at work, so I only work 3 days a week, and two of my work days are fairly short. I decided to skip the two short days (just using the onion while I'm home), and for just one day (Thursday), I'll bring it to work. It's staff meeting day anyway...nobody is going to smell it, except maybe one student. No sweat! And if I wear my crocs, I'll be able to slip my shoe on quickly if needed. Why did I put this off again?

Ok, now to something a bit yummier. I made pumpkin bread today! Now, I mentioned a long time ago that I like to make jars of stuff to give people ever year. The pumpkin bread was from one of those jars. I love the leftovers as much as I love the gifts! They always come in handy, and give me lots of new recipes to use. Sometimes, I'll make up extra jars during the year so that I'll have quick, easy recipes on hand. Here's a picture of the first jars I ever put together:
This one was green and yellow split pea soup. Super easy, super cheap, and makes a HUGE pot of soup. Anyway, I've had these jars of pumpkin bread in the cupboard for awhile, and the only time I ever make it is around Harvest time, if I'm asigned cakes and ale for a ritual...which...well...hasn't happened in a long while, beings that I'm very super duper extra solitary right now. Which means, I haven't made pumpkin bread in ages. I've had the jar sitting on the counter for a week, so I FINALLY went for it today! Here's the recipe:

Quick Pumpkin Bread

2 c. all-purpose flour
1 c. packed light brown sugar
1/2 c. raisins
1/2 c. chopped pecans or walnuts
1 1/2 tsp. pumpkin pie spice
1 tsp. baking soda
1/2 tsp. baking powder
1/2 tsp. salt

1. Layer ingredients attractively in any order in 1-quart food storage jar with tight-fitting lid. Pack ingredients down slightly before adding another layer.
2. If gifting (or if desired), cover top of jar with fabric, attach recipe tag with raffia or ribbon.

Recipe Tag:
1/3 cup butter, softened
2 eggs
1 c. canned pumpkin (I save and freeze my leftover Samhain pumpkin ever year, just for this recipe)
1 jar Quick Pumpkin Bread Mix

1. Preheat oven to 350 F. Spray 8 1/2 x 4 1/2 inch loaf pan with nonstick cooking spray (I didn't have any...used olive oil, worked fine).
2. Beat butter in large bowl with electric mixer until creamy. Add eggs, one at a time, beating well after each addition. Beat in pumpkin until well blended. Add contents of jar; stir just until blended. Pour into prepared pan.
3. Bake 50-55 minutes or until toothpick inserted into center comes out clean (mine took 65 minutes, but I had too much liquid in my bread...it came out fine, though). Cool in pan on wire rack 15 minutes. Remove from pan and cool completely on wire rack. Makes 1 loaf.

And here is the finished product:
Aaaaaand, last but not least (and not the least of what I did today), I made vanilla syrup! My mother in law gave me these bottles of syrup that I've been using in my coffee. I knew that once they were gone, I was going to miss them terribly. My coffee has been so yummy lately! So, I looked up how to make syrup. I'm not a big sugar fan, though, so we have no sugar in our house. I wondered if I could make it with splenda? I have heard bad things about splenda, but we have tons of it, so why not use it up, eh? So, I made the syrup just like I would with sugar...twice as much splenda as water, in a pan. The splenda completely dissolved in the water without even heating it. But it seemed rather thin, and had a funky after taste. So I decided to try adding some vegetable glycerine, which is very sweet. It didn't make it any thicker, but it helped with the after taste. I used my homemade vanilla extract (2 tsp), boiled the syrup for a couple minutes to burn off the alcohol, and it is FABULOUS! Sooo much better than the storebought stuff! Here's the finished product:
Cheap, easy, SUPER yummy, and easy to store in the bottles I already had. I like that. :-)

Have a great day, all!

Friday, March 6, 2009

My Bread Machine

I think I'm going to like it a whole lot more now. Check this out! So apparently, the ingredient I've been missing is vital wheat gluten. Scroll down to "Our Daily Bread" for an awesome whole wheat bread recipe in the bread machine. I'll have to make bread next week. I have a ton of bread right now (3 loaves...who needs that much for two people?), so I'll have to wait to experiment, but I'm looking forward to it!

Making Stuff

Another of my favorite things (definitely nearing the top of the list) is making stuff. I'm sure I'll post many, many entries about the stuff I make, and I'm really looking forward to those posts. But for now, how about if I post about my Homemade Vanilla Extract.
This picture is from the day I first put everything together. My plan was to make Vanilla Extract for the holidays this year, and give the bottles out as gifts. I usually end up making between 15-30 jars to give out. So, I bought a ton of alcohol, a huge bag of beans, 3 dozen jars...and I gave away NINE jars as gifts. Which means I have a TON left. I've researched on the internet, and Pure Vanilla Extract is pretty pricey. I've been selling bottles to friends and co-workers at rock bottom prices, and I'm so glad they're selling. It's steeped for about 3 months, and it's all ready to go.
I've heard great reviews from friends and family who have used it (from my sister in law: "Just letting ya know i cracked the lid on that Vanilla its makes some really good pancakes....kids gobbled them up like they were goin out of style....lol thank you").

Oh, and the best part? It's perpetual Vanilla! As you use it up, just keep adding vodka. Since I'm leaving the beans in the jars, it will just keep making more Vanilla Extract. So, this one bottle will last for years! It smells delicious, too.